Table of Contents
Introduction to Easy Chocolate Bun Recipe
What Are Chocolate Buns?
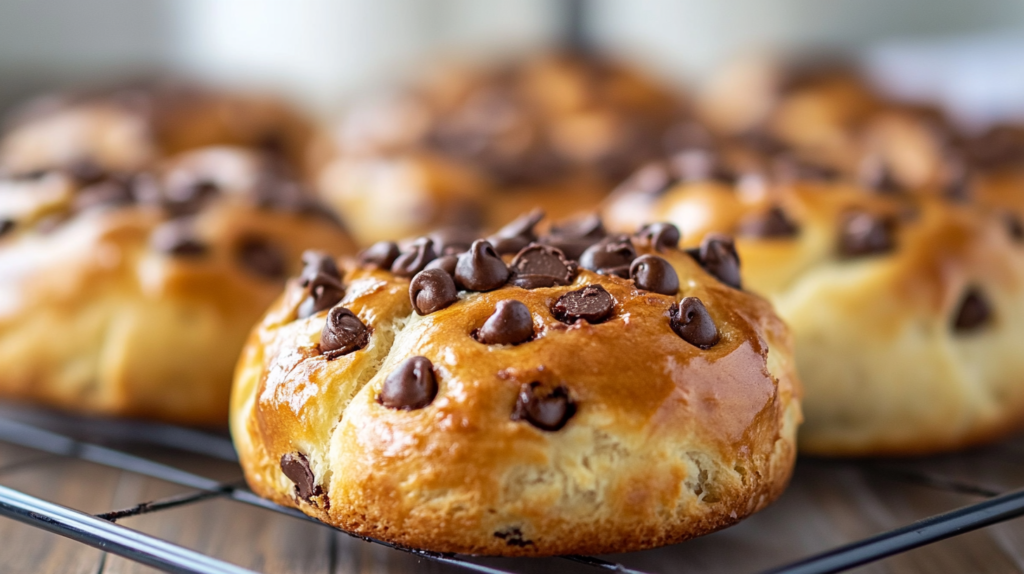
Easy Chocolate bun recipe is a delightful baked treat that combines the softness of fluffy bread with the indulgent richness of chocolate. These buns are often filled with gooey chocolate or topped with a glossy chocolate glaze, making them a favorite among both children and adults.
The Perfect Combination of Soft Bread and Rich Chocolate
The beauty of chocolate buns lies in their harmonious blend of textures and flavors. The pillowy softness of the bread provides a comforting base, while the chocolate—whether melted inside or layered on top—adds a luxurious, sweet, and slightly bitter contrast. This combination creates a satisfying snack that feels both indulgent and wholesome.
Why Chocolate Buns Are a Favorite Snack
Chocolate buns are cherished for their versatility and universal appeal. Perfect as a breakfast treat, an afternoon snack, or a dessert, they’re easy to enjoy on the go or paired with a warm cup of coffee or tea. Their comforting flavor and texture make them a go-to option for satisfying cravings and bringing a touch of sweetness to any moment.
Benefits of Making Chocolate Buns at Home
Freshly Baked Buns with Customizable Ingredients
When you make chocolate buns at home, you have complete control over the ingredients. You can use high-quality chocolate, choose whole-grain or gluten-free flour, and adjust the sweetness to your liking. This flexibility ensures your buns are not only delicious but also tailored to your dietary needs and preferences. Plus, nothing beats the aroma of freshly baked buns wafting through your kitchen!
Cost-Effective Compared to Store-Bought
Homemade chocolate buns are a budget-friendly alternative to store-bought options. With simple pantry staples and a little effort, you can create a batch that rivals those from a bakery—often at a fraction of the cost. Making them at home also allows you to produce a larger quantity, ensuring there’s enough to share with family and friends.
The Joy of Homemade Baking
Baking chocolate buns at home is more than just a practical choice—it’s an enjoyable and rewarding experience. The process of kneading dough, watching it rise, and filling it with rich chocolate brings a sense of accomplishment. Sharing your freshly baked buns with loved ones adds a personal touch that store-bought treats simply can’t match. It’s a creative and satisfying way to bring a little sweetness into your life.
Ingredients for Easy Chocolate Buns Recipe
Core Ingredients: Flour, Cocoa Powder, Sugar, and Butter
To make soft, rich chocolate buns, you’ll need a few basic ingredients:
- Flour: All-purpose flour works well, but bread flour can give an extra chewy texture.
- Cocoa Powder: Adds a subtle chocolate flavor to the dough.
- Sugar: Sweetens the buns and enhances the overall flavor.
- Butter: Provides richness and keeps the dough soft and tender.
These ingredients create the perfect base for chocolate buns that are both fluffy and indulgent.
Choosing the Best Chocolate for Filling
The filling is the heart of a chocolate bun, so it’s important to choose high-quality chocolate.
- Dark Chocolate: Offers a rich and slightly bitter flavor for those who prefer less sweetness.
- Milk Chocolate: Ideal for a creamier and sweeter filling.
- Chocolate Chips: A convenient option that melts beautifully inside the buns.
Experiment with your favorite type of chocolate to create a filling that suits your taste.
Optional Toppings: Powdered Sugar, Chocolate Glaze, or Nuts
Elevate your chocolate buns with optional toppings:
- Powdered Sugar: A light dusting adds a touch of elegance and sweetness.
- Chocolate Glaze: Drizzle over the buns for a decadent finish.
- Nuts: Crushed hazelnuts, almonds, or pecans add a delightful crunch and extra flavor.
These toppings make your buns even more irresistible.
For more dessert inspiration, explore this Chocolate Cobbler Recipe.
Tools and Equipment Needed
Essential Tools: Mixing Bowls, Whisk, Rolling Pin, and Baking Tray
To prepare and bake chocolate buns, you’ll need the following tools:
- Mixing Bowls: For combining the dough and other ingredients.
- Whisk: Helps ensure the dry ingredients are evenly blended.
- Rolling Pin: Useful for shaping the dough.
- Baking Tray: Non-stick or lined with parchment paper for perfect baking results.
These basics are enough to get started with your chocolate bun recipe.
Using a Stand Mixer for Kneading
While kneading by hand is traditional and satisfying, a stand mixer can save time and effort.
- Use the dough hook attachment for even kneading.
- Mix on medium speed until the dough is smooth and elastic, typically around 8–10 minutes.
A stand mixer is especially helpful for beginners or those making larger batches.
Alternatives for Shaping Buns
If you don’t have a rolling pin or want to try different shapes:
- Use a flat surface and your hands to shape the dough into rounds or spirals.
- For a rustic look, pinch small portions of dough and roll them into balls.
- Experiment with braiding or twisting for decorative buns.
Shaping buns is a chance to add your personal touch to the recipe!
Ingredients
For the Dough
- 2 ½ cups all-purpose flour
- ¼ cup cocoa powder
- ¼ cup granulated sugar
- 1 teaspoon instant yeast
- ½ teaspoon salt
- ¾ cup warm milk
- ¼ cup unsalted butter, melted
- 1 large egg
For the Filling
- ½ cup chocolate chips (or chopped chocolate)
For the Topping
- 2 tablespoons milk (for brushing)
- ¼ cup melted chocolate (for drizzling, optional)
Step-by-Step Guide to Making Easy Chocolate Buns Recipe
Preparing the Dough: Mixing and Kneading
- Combine the Ingredients: In a mixing bowl, combine flour, cocoa powder, sugar, and a pinch of salt. Add softened butter, milk, and yeast.
- Mix and Knead: Mix the ingredients until a sticky dough forms. Knead by hand or use a stand mixer with a dough hook until the dough is smooth and elastic, about 8–10 minutes.
First Proofing: Why It’s Essential
Allow the dough to proof for 1–2 hours in a warm, draft-free place. This process:
- Activates the yeast, causing the dough to rise and develop its structure.
- Improves the flavor and texture of the buns.
Cover the bowl with a damp cloth or plastic wrap to retain moisture.
Adding the Chocolate Filling
- Roll out the dough into a rectangular shape, about ½ inch thick.
- Spread or place your chosen chocolate filling evenly over the dough. Options include chocolate chips, chunks, or spreads like Nutella.
- Fold or roll the dough to encase the filling, depending on your desired shape.
Shaping and Second Proofing
- Divide the dough into equal portions and shape into buns.
- Place the buns on a lined baking tray, leaving space for them to expand.
- Let the buns proof for another 30–45 minutes. This second rise ensures a fluffy texture and even baking.
Baking to Golden Perfection
- Preheat the oven to 375°F (190°C).
- Brush the buns with an egg wash or plant-based milk for a glossy finish.
- Bake for 15–20 minutes or until golden brown.
- Let the buns cool slightly before serving to enjoy the melty chocolate filling.
For guidance on achieving perfect texture in baked goods, check out this Perfect Brioche Recipe.
Variations of Chocolate Buns
Adding a Cream Cheese Filling
Combine cream cheese with a little sugar and vanilla extract for a tangy, sweet filling. Add it alongside the chocolate or as a standalone filling for a delightful twist.
Using White Chocolate or Dark Chocolate
Switch up the flavor profile by using:
- White Chocolate: For a creamy, sweet filling that contrasts beautifully with cocoa dough.
- Dark Chocolate: For a rich, bittersweet option that complements the bun’s sweetness.
Nut-Filled Chocolate Buns for Added Crunch
Incorporate crushed nuts like hazelnuts, almonds, or pecans into the filling. The added crunch pairs wonderfully with the soft bread and gooey chocolate.
Vegan Chocolate Buns Using Plant-Based Ingredients
For a plant-based version:
- Replace dairy milk with almond, soy, or oat milk.
- Use vegan butter or coconut oil.
- Opt for dairy-free chocolate or cocoa-based spreads.
These variations ensure that everyone can enjoy the joy of homemade chocolate buns.
Tips for the Perfect Chocolate Buns
Achieving a Soft and Fluffy Texture
- Use Bread Flour: Its higher protein content helps create a chewier, softer texture.
- Don’t Skimp on Proofing: Allow the dough to rise fully during both the first and second proofing to develop the ideal structure.
- Add Moisture: Incorporate ingredients like milk, butter, or yogurt to enhance the dough’s softness.
Knead the dough just enough to activate the gluten without overworking it, which can make the buns dense.
Preventing the Chocolate Filling from Leaking
- Seal the Edges: When rolling or shaping the dough around the filling, press the edges firmly to prevent leaks.
- Use Chilled Chocolate: Solid chocolate pieces melt slower and are less likely to seep out during baking compared to spreads.
- Avoid Overfilling: Use just enough chocolate to achieve a rich flavor without overwhelming the dough or causing structural issues.
Balancing Sweetness in the Dough and Filling
- Adjust Sugar Levels: Reduce the sugar in the dough if using a sweet filling like milk chocolate or Nutella.
- Add a Pinch of Salt: A touch of salt enhances the chocolate flavor and balances the overall sweetness.
- Taste Test: Experiment with the sweetness levels to match your personal preference or the type of chocolate you’re using.
Serving Suggestions
Best Enjoyed Warm with a Cup of Coffee or Milk
Chocolate buns are at their best when served warm, allowing the chocolate filling to be gooey and indulgent. Pair them with:
- Coffee: For a slightly bitter contrast.
- Milk: A classic combination that’s perfect for kids and adults alike.
Serving with a Drizzle of Caramel or Chocolate Sauce
Take your chocolate buns to the next level by adding:
- Caramel Sauce: For a rich, buttery sweetness.
- Chocolate Sauce: Double down on the chocolate flavor for extra decadence.
Drizzle the sauce just before serving to keep the buns fresh and visually appealing.
Pairing with Fresh Fruits Like Strawberries or Bananas
Complement the richness of the buns with the freshness of fruits:
- Strawberries: Their tartness contrasts beautifully with the sweet, chocolaty flavor.
- Bananas: Add a creamy, tropical touch that pairs seamlessly with chocolate.
Serve the fruits alongside the buns or as a topping for a visually stunning and delicious plate.
Storing and Reheating Chocolate Buns
How to Store Buns to Keep Them Fresh
To keep your chocolate buns fresh:
- Room Temperature: Store in an airtight container or wrap them in plastic wrap. They will stay fresh for up to 2 days.
- Refrigeration: If the weather is warm or the buns contain perishable ingredients, refrigerate them. Seal tightly to prevent drying out, and enjoy within 3–5 days.
Reheating Tips for Maintaining Softness
To bring your buns back to their freshly baked state:
- Microwave: Heat individual buns for 10–15 seconds at medium power. Cover them with a damp paper towel to retain moisture.
- Oven: Warm the buns in a preheated oven at 300°F (150°C) for about 5–7 minutes. Wrap them in foil to prevent them from drying out.
Freezing and Thawing for Future Enjoyment
Chocolate buns freeze well, allowing you to enjoy them later:
- Freezing: Once cooled, wrap each bun individually in plastic wrap and place them in a freezer-safe bag. Store for up to 2 months.
- Thawing: Let the buns thaw at room temperature for a few hours. For a freshly baked feel, reheat as described above.
Common Mistakes to Avoid
Overmixing the Dough
Overmixing can:
- Develop too much gluten, leading to tough and dense buns.
Solution: Mix the dough until just combined and smooth for a light and fluffy texture.
Using Too Much Filling
Excess filling can:
- Leak out during baking, making a mess and causing uneven buns.
Solution: Use the right amount of filling and seal the edges properly to keep it contained.
Overbaking or Underbaking the Buns
- Overbaking: Results in dry buns that lose their soft texture.
- Underbaking: Leaves the dough raw in the center.
Solution: Bake at the recommended temperature and keep an eye on the buns during the final minutes. They should be golden brown on top and sound hollow when tapped.
By avoiding these mistakes, you’ll consistently achieve soft, delicious chocolate buns every time!
FAQs About Easy Chocolate Bun Recipe
Can I Use Instant Yeast?
Yes, instant yeast works perfectly for chocolate buns. It does not require activation in warm water like active dry yeast, so you can mix it directly into your dry ingredients. If substituting for active dry yeast, use the same amount but skip the proofing step.
What’s the Best Substitute for Butter?
If you’re looking for a butter substitute, try:
- Margarine: A similar flavor and texture to butter.
- Coconut Oil: Adds a subtle coconut flavor and keeps the dough moist.
- Plant-Based Butter: Ideal for vegan recipes.
Adjust the quantity slightly if your substitute has a higher water content than butter.
How Do I Prevent the Dough from Becoming Too Sticky?
Sticky dough can be managed by:
- Adding Flour Gradually: Sprinkle a little extra flour as you knead, but don’t overdo it, as this can make the dough too dense.
- Using Oiled Hands: Grease your hands lightly with oil to prevent sticking without altering the dough’s consistency.
- Proper Kneading: Knead the dough until it becomes elastic and less tacky.
Can I Make These Buns Without a Mixer?
Absolutely! You can knead the dough by hand:
- Combine the ingredients in a bowl until they come together.
- Transfer the dough to a floured surface and knead for about 10–12 minutes until smooth and elastic.
Hand-kneading adds a personal touch and can be quite satisfying.
Why Is My Dough Not Rising Properly?
Common reasons for dough not rising include:
- Inactive Yeast: Ensure your yeast is fresh and check the expiration date.
- Incorrect Water Temperature: Water that is too hot can kill the yeast, while water that is too cold won’t activate it. Aim for lukewarm water (around 110°F or 43°C).
- Drafty Environment: Yeast thrives in a warm, draft-free spot. Cover the dough and place it in a warm area to proof.
Can I Use Chocolate Chips Instead of a Chocolate Bar?
Yes, chocolate chips are a convenient and delicious option. They melt beautifully and evenly distribute throughout the buns. Opt for semi-sweet, milk, or dark chocolate chips based on your flavor preference. For a more decadent filling, combine chocolate chips with a little cream or butter to create a rich ganache-like texture.
By addressing these FAQs, you’ll have the confidence to bake perfect chocolate buns every time!
Conclusion
Recap of the Chocolate Bun-Making Process
Baking chocolate buns at home is a delightful process that combines simple ingredients and basic techniques to create a delicious and satisfying treat. From preparing and kneading the dough to adding a rich chocolate filling, shaping the buns, and baking them to golden perfection, every step contributes to their irresistible texture and flavor. With proper storage and reheating tips, you can enjoy these buns fresh or save them for later indulgence.
Encouraging Readers to Try Different Variations
One of the best aspects of making chocolate buns is their versatility. You can experiment with various fillings like cream cheese, nuts, or even white chocolate to suit your preferences. Vegan and gluten-free adaptations make these buns accessible to everyone, ensuring they can be enjoyed by all. Creativity in toppings, shapes, and flavor combinations adds a personal touch to your homemade baking.
Highlighting the Joy of Baking Homemade Treats
There’s something uniquely rewarding about baking your own chocolate buns. The process is as enjoyable as the result—kneading dough, smelling it rise, and finally savoring the warm, chocolaty goodness straight from the oven. Baking at home allows you to share these delicious creations with loved ones, making every bite a celebration of effort, care, and joy. Whether for a special occasion or a simple indulgence, homemade chocolate buns are a treat worth savoring. For more creative baking recipes, check out this Chocolate Bread Recipe.


